
WEBSITE MOVED TO DXCOMMANDER.COM
We are working on an automatic re-direct to the new site for you. In the meantime, please surf over to dxcommander.com and find your product there. Thank you!
The remainder of this page will shortly be archived.
Perhaps you’ve seen the YouTube video – or had a copy with me whilst I was using just this system?
For three-in-a-row or triangular array users on 40m.
(Scroll down to add to cart)


DX Commander M0MCX VPA (Vertical Parasitic Array). Click for plot.
Listen to me on 40m into ZL one morning last year on this antenna.
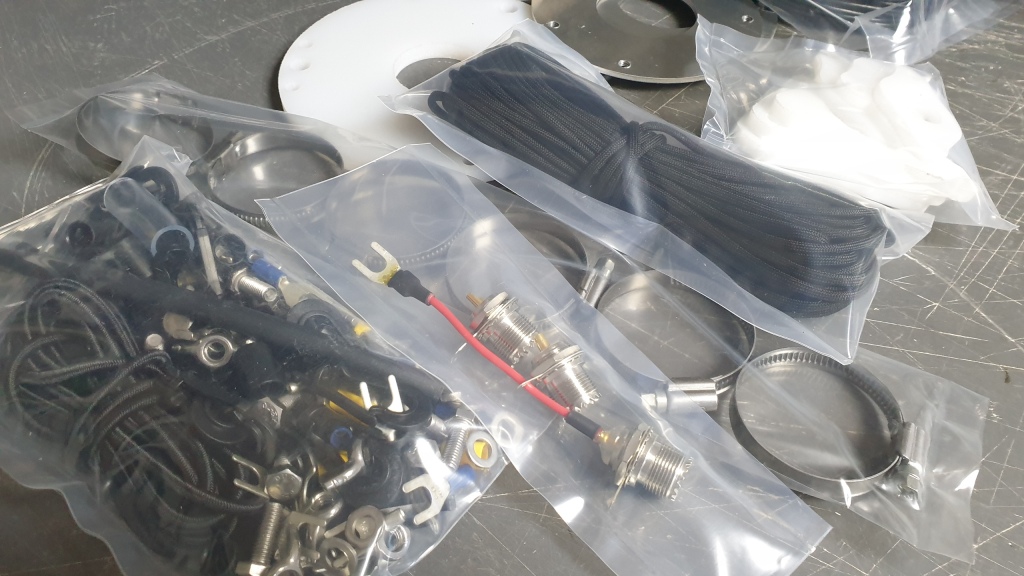
IMPORTANT: This is complete kit ready to go. What’s in the bag:
- 3 x DX Commander 10m poles
- 3 x Regular DX Commander Ground Plates
- 3 x SO239 for all element
- 3 x Guy points
- 200m DX10 antenna wire (good for 1500W SSB) antenna wire, enough for 3 x vertical elements and 54 x 5m radials (44 radials for your centre radiator and 5 radials each for director and reflector)
- Set of nuts, bolts and washers for all elements (circa 22 each with spares)
- Circa 22 fork connectors
- Circa 4 x heat shrink lengths (to weather proof radials and SO239)
- 3 x 10m Paracord lengths for guying (just supply your own guy stakes)
- Temflex 3M tape and 22 cable ties to secure each fibreglass section joins
The construction method is very easy and each element is based on a spacing of 8m between each vertical element.
For three-in-a-row users, the following dimensions produce a perfect match at 7.1Mhz.
INSTRUCTIONS:
- Fit the Ground Plate by unscrewing the cap at base of pole and gently screwing it back on again after nesting the Ground Plate over the threads.
- Fit SO239s and solder your elements (see below)
- Fit the bolts, washers and wing nuts to each of the Ground Plates
- Extend the telescopic pole
- Fit the guy point by slipping it all the way down the pole (It will sit on top of the tape and cable tie at the first join – see below)
- Use 2 x wraps of quality insulation tape on each of the joins (optionally, start with 2 wraps of self amalgamating tape then the insulation tape afterwards)
- Add a cable tie just above each join so that the tape doesnt slip on the pole (no need to cable tie last 2 sections
Use spacing of 8.75m between all elements – and erect ONE element as a time.
Initially build all elements (use the SO239s supplied) and use an SWR meter to check for resonance as follows:
- Driven element tuned for 7.255 Mhz (use SWR meter)
- The front (director) element tuned for 7.395 Mhz
- The rear tuned for 7.035 Mhz
(You can proportionally move these frequencies up and down to achieve your desired part of the band but it will have a wide bandwidth).
Suggest cutting your element about 11.2m long, gently helically wind it around the pole (not more than 1 wrap per metre) and fold it back on itself so it comes back down the pole about 1.5 to 2m.
- TUNING: Initially, build a single vertical and get it tuned for 7.255 MHz on your analyser / SWR meter then lay it on the ground and do the same for the rear (reflector) and tune that for 7.395 MHz. Lay that down and again do the front (director) and tune that for 7.035.
Original prototype with choc connector to allow temporary connection for tuning.
Do the same with Reflector and Director then:
- Take 2 x PL259 connectors and SHORT them out with a small piece of wire between the centre conductor and the body. Screw together and cover in self-amalgamating tape.
Once complete, you should achieve an impedance of around 40-50 ohms. I achieved a perfect match at 7.10 Mhz. I am achieving better than 1:1.2 SWR across the whole band. For those world-wide amateurs with access to the 7.2 – 7.3Mhz, you will still achieve better than 1:1.4 SWR even at 7.3Mhz. At 7.0mhz, I am showing an SWR of 1:1.2.


")


")
Coax feed for the scientists: Because impedance repeats every half wavelength, I had pre-cut a full wavelength of coax, less the amount of the Velocity Factor (VF). This way, I can make measurements in the shack, accurately without having to venture outside. I used a 50 ohm coax with a VF of 0.82. The length of my coax is therefore around 34.5 metres. Of course, you could also use a wavelength (or multiple of any half-wave length) of 75 ohm coax too, as long as it’s cut accurately according to the VF since the impedance at the feedpoint will be the same at the termination (rig) end.