
This job is not for the feint-hearted. You will need a natural tendency for engineering, be accurate and be comfortable with knots. However, there’s no reason that most small teams of keen amateur radio operators can’t build this as a project for field day use.
Let me explain how I built the one shown in the pictures, then I’ll cover the learnings with you later along with my own do’s and don’ts.
How I built a 3-section 60 feet scaffold mast from 20 foot aluminium tubes.
Equipment
Some people mistakenly call this arrangement a “gin-pole” tower however that’s incorrect; the arrangement shown in the drawing is called a “falling derrick”. I designed this with 3 x 6m (20 feet) uprights and I used a section (and a half again) for the falling derrick, as shown in the diagram.
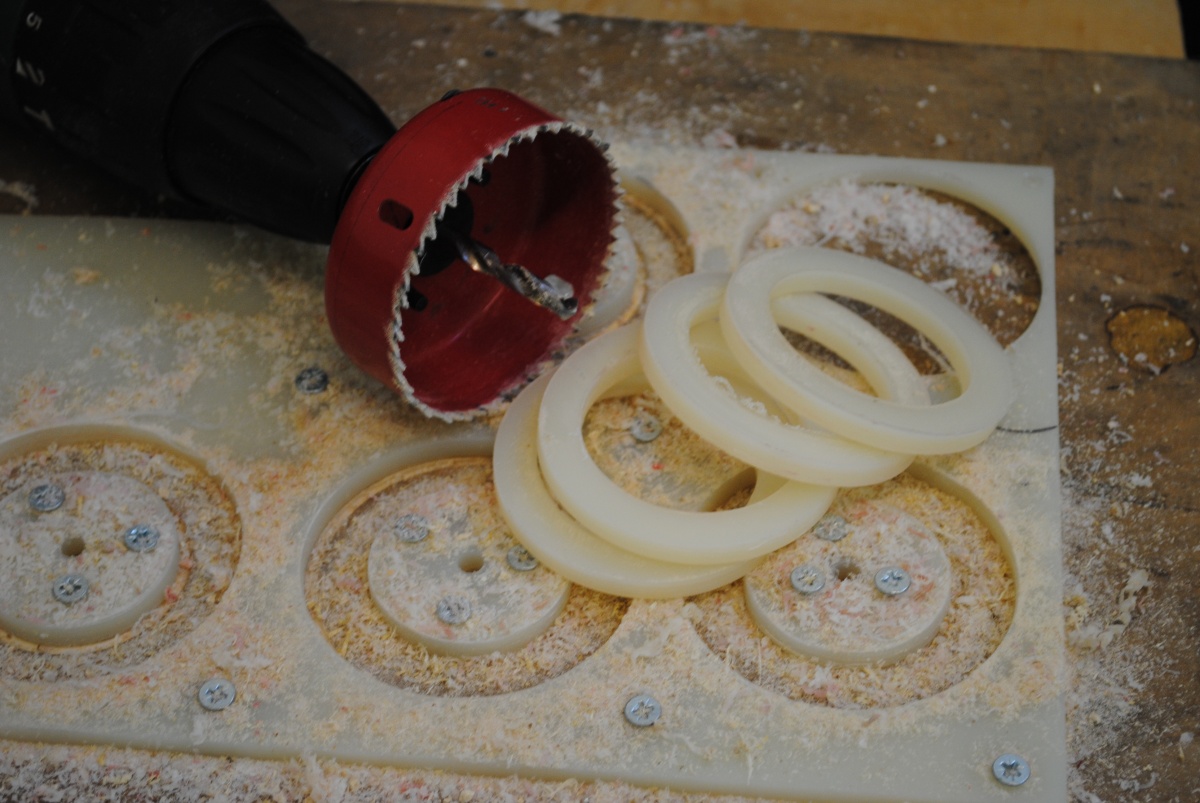
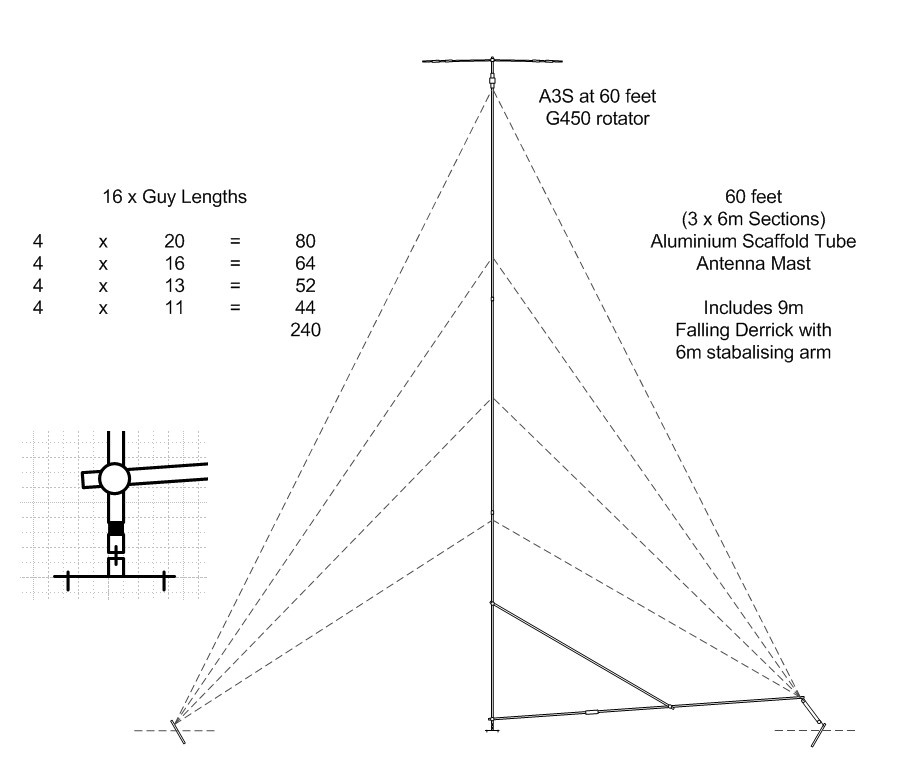 Four guying points were required. From the bottom: at the top of the lower pole, one in the middle of the centre pole and then two for the top section spaced out at 1m from the bottom (3 feet) and same again at the top. I made the guy points from aluminium plate and had them sit on nylon washers that I cut out. The guy points for the middle and top sections are seated on three bolts that I drilled and tapped into the pole. The nylon washer sit on top of these bolts, then the aluminium guy plates on top of the washer. I had the idea of placing the rotator between the two top sections and this would have worked as a temporary mast bearing. The lower guy point didn’t need any drilling and tapping, it just sits on the scaffold connector.
You will need to connect each vertical section together. Cheap scaffold connectors will do the job adequately. There is no bending torque on these sections, they are only to hold them steady.
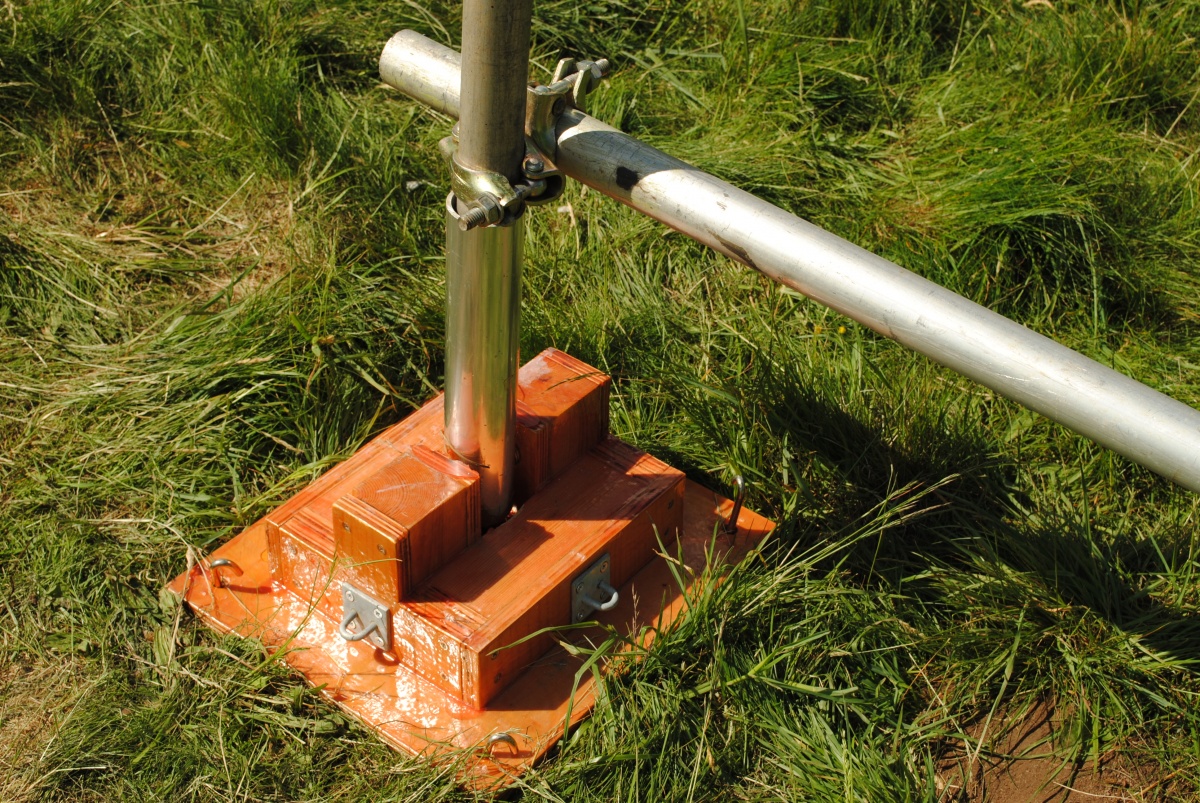
I made a swivel base from wood and a spare section of large diameter aluminum tubing to clip the mast into. This is permanently cross bolted through the wood with a large 10mm (just under half-inch) threaded bar which is the hinge.
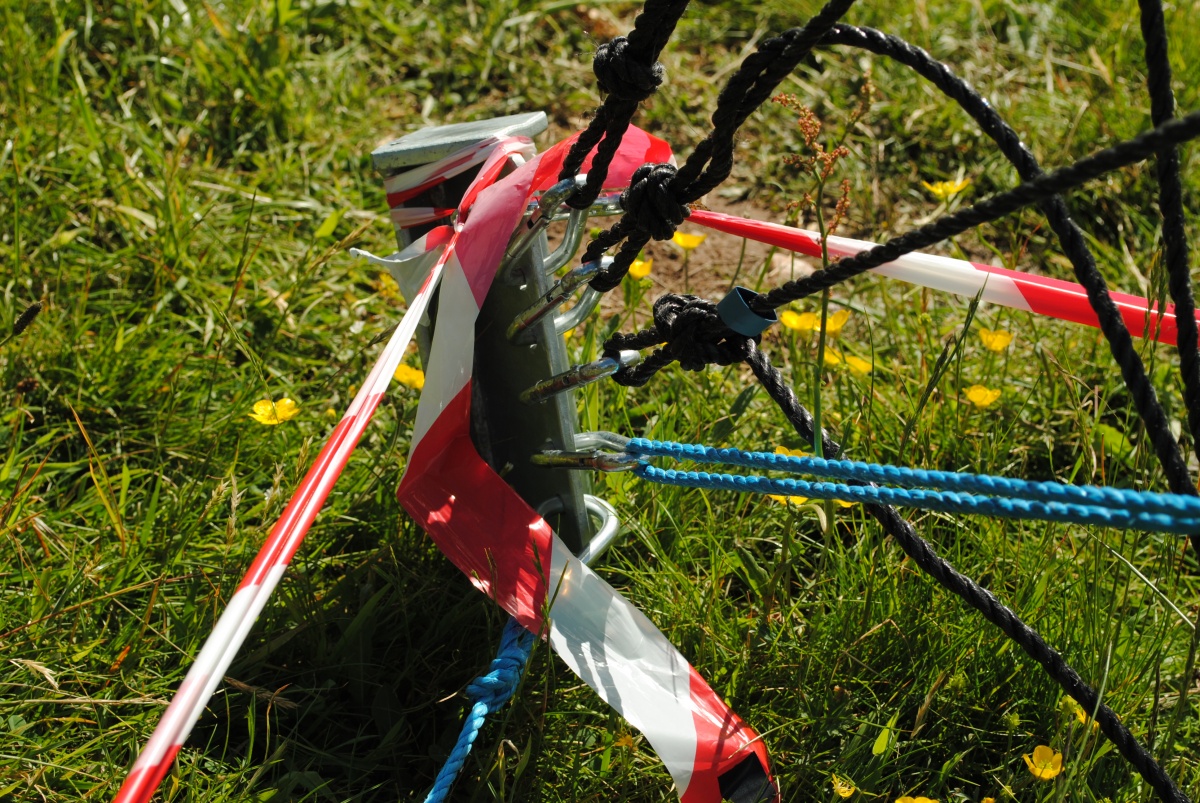
We had the guy stakes made for us, at considerable cost (and a total waste of money since you can buy these from Barenco or your preferred hardware supplier) and procured the requisite amount of cheap 8mm (just over quarter inch) “lorry rope” in black. We wanted to make this a “repeatable” erection and therefore we used carabinas and colour coded each of the ropes for future use.
Obviously, you’ll need a few poles (tubes) and have them pre-drilled with the guy point bolts and eye-bolts for anchor points on the falling derrick. The eye bolts on the top connect to the mast, the eye bolts on the side connect to the adjacent guy stakes and the lower eye bolt has a dual purpose; it connects to the tow-bar and also to the final guy stake at this connection point.
Building
Firstly, it became apparent that the geometry of this tower is critical. Starting with the base hinge, measure out in 90 degree increments, 9 metres to where the guy stake needs to be hammered into the ground. The base hinge needs to be secured lightly, however there should never be too much lateral pressure on the base, only downward. You will find it should stay put. We used heavy duty roofing pegs anyway.
You will need to build this on very flat land. If the ground is sloping, build it so that the falling derrick is either facing away – or towards the slope, not parallel to it otherwise the geometry will be impossible.
The first challenge is to have the first section erected as a stand-alone vertical tube. Lay the tube flat on the ground and insert into the swivel base. You will have a small spare section (1 metre) of stub mast that you can use temporarily to fit on top of the first section with a scaffold connector to slip the first guying point over. You will remove this stub mast later.
Attach 4 first stage guying ropes to the top of this mast section and manually hoist the mast to the vertical position. Have one or two team members hold the pole upright whilst those that are knot-minded can attach this vertically to the guying stakes.
Have a coffee and observe your success.
Now lay the falling derrick on the ground. If you’ve done your geometry right, the end of this pole should be fractionally short of the guying point. That’s perfect.
The falling derrick will attached to both the mast – and to the adjacent guying points so that as the mast lowers, the falling derrick won’t fall over sideways, so go ahead and bolt the falling derrick to the bottom of the first section by the hinge and attach the side-ropes to the adjacent guy stakes.
Lift the end of falling derrick so that it’s parallel to the ground and with a team member holding the mast section upright, disconnect the guy rope that’s holding this vertical vertical and attach to the falling derrick. Gravity alone should keep the mast upright, however you’ll need a small connector rope in the future from the bottom of the falling derrick to the master guy point. You will be connecting and disconnecting this guy point regularly during this process, so for ease of expression, we’ll call this the “connection guy” and I recommend that once this distance between the falling derrick this guy stake is accurate, fit a carabina.

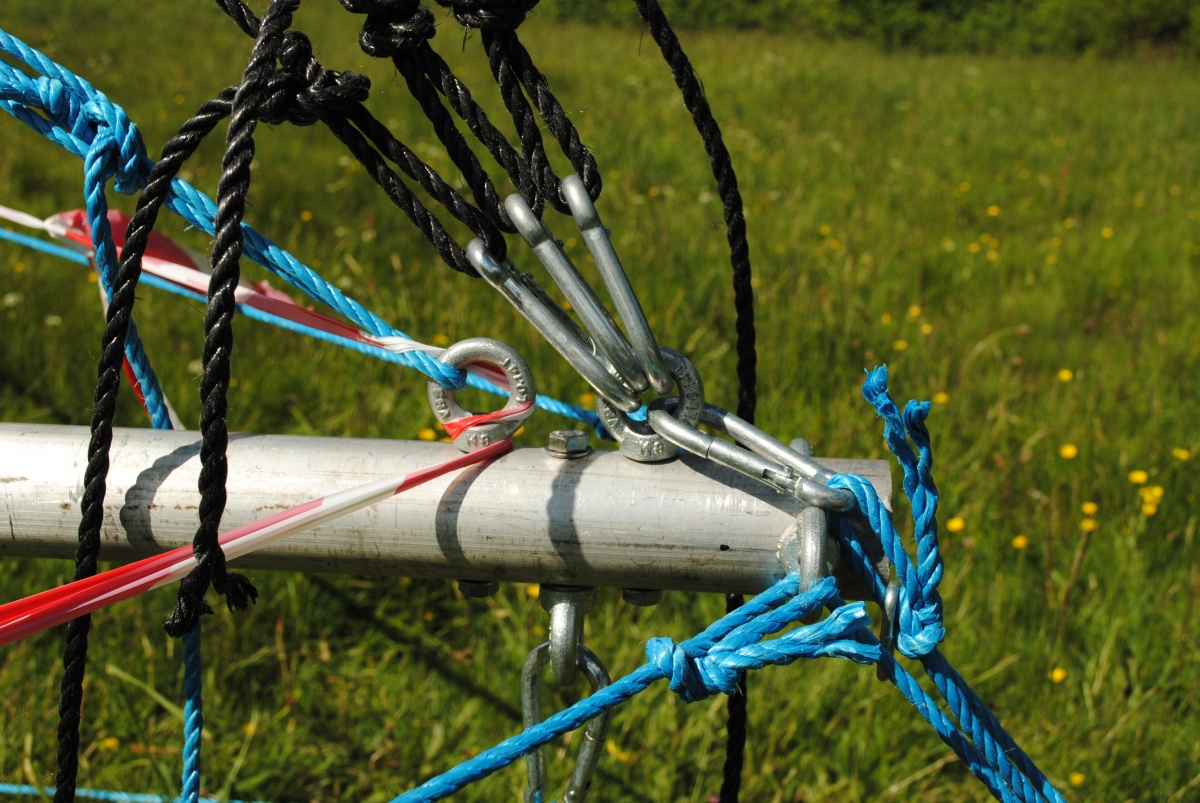
Note: You need to connect a long rope to the bottom connector on the falling derrick. This is what I call the Hoist Rope and is why there’s a load of blue rope always hanging around under the rig here in my pictures, it’s the rope I will eventually attach to my tow-bar to erect the whole thing.
Now take a picture since you are almost half-way there. At this stage, if there are any geometric corrections to make, I suggest you do so now and make sure that the 4 major guy ropes are tensioned nicely with the falling derrick attached to the connection guy stake (which will regularly need to be released and reconnected. Fitr that carabina).
So, you now have section one installed with a disproportionate big falling derrick. With all hands ready then, you need to release the connection guy and have a team member pull the mast over towards them. Assuming the geometry is perfect, you will have an almost balanced see-saw with the tow-rope allowing the assembly to tilt over. I found that it was top-light at this stage so the team member that’s pulling over may need to put his weight into getting the lowering started.
Installing the centre section
With section one lying n the ground, release the little stub mast from the top of section one and in its place, put in the middle 6m (20 foot) section. This section should have a guy point ready in the middle of the pole. Connect 4 ropes to this guy point and lay them out to each guy point.
But wait, you can’t lay out the rope to the connection guy stake because the falling derrick is now vertical. So, you will need to release one of the falling derrick side ropes and gently lower the falling derrick to the ground. Be very careful now because unless you have continually secured the tow-rope, the pole could crash down causing very serious injury – even death. Now you can connect the fourth guying point to the end of the falling derrick, guestimating the tension to apply here. Too loose, and as you attempt to raise the mast, the will not be enough tension on the falling derrick connector and the mast will appear to “banana”. Too much and it may banana towards you. Trial and error required.
Hoist the falling derrick back vertically again and reconnect to the side guying point. This is why we used carabinas. Reconnecting lengths of ropes with knots will give you a different tension each time but with the set-and-forget carabina, that’s one less job to worry about.
Now you are ready to lift two sections vertically. You may need the tow-bar this time, alternatively two team members can probably lift this. May I ask you to wear strong work-wear gloves please?
Once vertical, snap the connection guy in place and observe your handy-work. Cheap rope stretches and you may find the trueness of the mast is off. Spent time now to correct the vertical trueness of 8 guy points now and get the feel of the tension required. Use a good spirit level on the lower mast pole and with your eye, make adjustments to the 8 guy ropes and the structure feels very solid. A mild “shake” test will show you how well it’s performing. Note: Never conduct a shake test on a loose tower, or with the falling derrick disconnected from the connection point, it could collapse. Of interest, I pushed the limits of this technique and built an 80 foot version. The downwards pressure on the bottom pole / tube was so great that it buckled and the whole structure collapsed blowing a hole in my wallet. So please be warned.
Only one more section to go, disconnect the falling derrick from the connection point and lower the structure by pulling on the top guy, opposite the falling derrick.
I need to explain one engineering issue that will manifest itself once the whole structure is built. When you finally have 60 feet of poles, a rotator and maybe a tribander on top again, reducing pressure to any of the guy ropes may result in a collapse. In other words, imagine manually lifting the falling derrick a couple of feet into the air and considerably reducing the pressure on one side of the structure. Because of the way rope stretches, the lower sections will have more sideways pressure on the vertical mast that the higher sections and a small banana shape may materialise. In the event that the downwards pressure is high, this banana might increase and you’ll be looking at a mast-collapse.
So how do we lower the tower? You will find, due to the way sin and cos works (back to school!) that if you connect the lowering rope to a tow-bar and keep it quite tight, a team member can pull on the whole structure, opposite the towing vehicle and the structure will change from vertical to a few degrees over without moving the vehicle or anything else. The tow rope will just find it’s equilibrium. But now the tension will be on the falling derrick side possibly causing a reverse banana.
Let’s fit the last section
You find lowering the two-section mast is a piece of cake. Now fit the last section and repeat the process as you did when you connected the middle section. You will need a further 8 ropes now, 4 long ropes – and 4 even longer.
Now you will need a tow-bar. Gently lift the three sections into the air with the vehicle and stop when the mast is just a few feet off the ground. A long banana shape is fine, in other words if you note say a 5 degree droop, it’s not a problem. Longer ropes stretch more and unless you do this with steel rope (nice idea actually for a permanent structure and a winch, perhaps all solid steel poles?) then you will see droop. If you try and correct this, you will find that once erect, there will be too much tension on the top guy points.
Look in your rear-view mirror. As the structure starts coming up vertical, stop. You will probably be able to pull it vertical by hand once it’s say at 70 or 80 degrees. Further, once the structure is beyond the tipping point, it will accelerate under its own weight and shudder to a thundering stop when the falling derrick hits the deck and the ropes opposite have an accidental pull-test. Just go slow here.
Reconnect the connection point, call your ham radio on VHF chums and tell them what you just did! 🙂
Time for another coffee.
Lowering the structure unweighted
Pull-over rope
With trial and error, I discovered that a rope should be connected from half-way up the centre pole (the centre guy position) to the top guy position. This rope should not be tight, but have a small amount of play so that you could perhaps pull it away from the mast by about a metre (3 feet). Fit a long rope (like 30m / 100 feet or so) with a steel shackle to it so that it can slide up and down this pulling-over assembly. This means that when the team member starts to pull the whole tower over, opposite the falling derrick, the forces are spread between two of the guying points rather in one place which can cause the structural integrity to change in one massive banana.
Assuming that you followed my instructions, you can release the connection point and have a team member gently pull on the 30m long pulling-over rope. The structure will tilt in a scary fashion and then you can jump in the car and lower the structure to the ground.
Fitting antenna and rotator
Just before we start fitting the 25 kilos of additional weight of hardware to the structure, I personally find it necessary to do a final lift with some weight. I happen to have an old 20Kg dumb-bell weight that slips over 2 inch tubing but I did find a cheat’s method: Have the car driver raise the mast so that antenna end of the mast is about 6 feet above the ground. You will see that mild banana shape we discussed. Now grasp it firmly and imagine about 20 or 30 kilos on top. Does it behave itself? If you are convinced from an engineering perspective that it seems to be happy, go ahead and fit the antennas and rotators etc and all the cables.

We discussed earlier that tipping point at around 70 degrees or so. Make sure the car driver doesn’t go too fast and slow right now when the mast is becoming vertical. Actually, the car driver will find the lift quite odd since at the beginning of the lift, quite a lot of forward movement hardly lifts the mast at all but near the end, the slightest motion will cause a disproportionate movement at the top of the mast. It a battle with sin, cos and the inverse square law at work.
That’s it. One 60 foot scaffold tower. You can’t build this on a whim.
Things I’d change next time
The only thing I’m not comfortable with in these pictures is the falling derrick which in my opinion was far too heavy and totally over-complex. We added a vertical bar to reduce the bending movement – and to keep the geometry correct when the mast was vertical and the falling derrick was horizontal. I think the idea of a long (9m) falling derrick was important, so I’d sleeve a small steel pole onto a half-sized (3m) aluminium pole to make the extension and let the falling derrick sit on top of a supermarket crate rather than install a further vertical section to let it self-align. I’d still end up with a 9m long falling derrick, but it would be lighter and easier to construct.
Do’s and Don’ts
- Wear super heavy workman gloves when handling ropes
- Use appropriate knots and check them before any heavy lifting (alpine butterfly knots make great loops to tighten down guy ropes into half hitches)
- Buy economy guying stakes
- Invest in better rope, although 8mm is absolutely fine
- Go slowly when raising or lowering
- Wear hard hats
- IMPORTANT: When de-constructing the assembly, you will end up at a time when either the falling derrick – or the last mast section is vertical in the air. It’s possible when undoing all the carabinas and other knots to accidently let this section fall. I did this and it missed me by a whisker. Go slowly and check every connection on the tear-down.
- The tow-rope needs a backup so that when the falling derrick is in the air, the mast lowered – and the tow rope is lifted off the back of the car, the falling derrick doesn’t just continue falling over. Use a small guy a few metres behind the falling derrick that can keep it upright regardless of whether the tow rope is taught or not.
- Build on flat ground


